The Intel 32-bit Hexadecimal Object file record format has a 9-character, 4 field, prefix that defines the start of record, byte count, load address and record type. The record format also has a 2-character suffix containing a checksum.
Color legend
As a visual aid, the fields of Intel HEX records are colored throughout this article as follows:
.mw-parser-output .legend{page-break-inside:avoid;break-inside:avoid-column}.mw-parser-output .legend-color{display:inline-block;min-width:1.25em;height:1.25em;line-height:1.25;margin:1px 0;text-align:center;border:1px solid black;background-color:transparent;color:black}.mw-parser-output .legend-text{} Start code Byte count Address Record type Data Checksum
Checksum calculation
A record’s checksum byte is the two’s complement of the least significant byte (LSB) of the sum of all decoded byte values in the record preceding the checksum. It is computed by summing the decoded byte values and extracting the LSB of the sum (i.e., the data checksum), and then calculating the two’s complement of the LSB (e.g., by inverting its bits and adding one).
For example, in the case of the record :0300300002337A1E, the sum of the decoded byte values is 03 + 00 + 30 + 00 + 02 + 33 + 7A = E2, which has LSB value E2. The two’s complement of E2 is 1E, which is the checksum byte appearing at the end of the record.
Hex code
Record type
Description
Example
00
Data
The byte count specifies number of data bytes in the record. The example has 0B (eleven) data bytes. The 16-bit starting address for the data (in the example at addresses beginning at 0010) and the data (61, 64, 64, 72, 65, 73, 73, 20, 67, 61, 70). 8 (0x08),[9] 16 (0x10)[9] and 32 (0x20) are commonly used byte counts. Not all software copes with counts larger than 16.[2]
:0B0010006164647265737320676170A7
01
End Of File
Must occur exactly once per file in the last record of the file. The byte count is 00, the address field is typically 0000 and the data field is omitted.
:00000001FF
02
Extended Segment Address
The byte count is always 02, the address field (typically 0000) is ignored and the data field contains a 16-bit segment base address. This is multiplied by 16 and added to each subsequent data record address to form the starting address for the data. This allows addressing up to one mebibyte (1048576 bytes) of address space.
:020000021200EA
03
Start Segment Address
For 80×86 processors, specifies the starting execution address. The byte count is always 04, the address field is 0000 and the first two data bytes are the CS value, the latter two are the IP value. The execution should start at this address.
:0400000300003800C1
04
Extended Linear Address
Allows for 32 bit addressing (up to 4 GiB). The byte count is always 02 and the address field is ignored (typically 0000). The two data bytes (big endian) specify the upper 16 bits of the 32 bit absolute address for all subsequent type 00 records; these upper address bits apply until the next 04 record. The absolute address for a type 00 record is formed by combining the upper 16 address bits of the most recent 04 record with the low 16 address bits of the 00 record. If a type 00 record is not preceded by any type 04 records then its upper 16 address bits default to 0000.
:020000040800F2
05
Start Linear Address
The byte count is always 04, the address field is 0000. The four data bytes represent a 32-bit address value (big-endian). In the case of CPUs that support it, this 32-bit address is the address at which execution should start.
:04000005000000CD2A
2.0 Record Types
The Intel 32-bit Hexadecimal Object file record format contains six record types
00 Data Record 01 End Record 02 Extended Segment Address Record 03 Start Segment Address Record 04 Extended Linear Address Record 05 Start Linear Address Record
2.1 Data Record
Record type 00, the data record, is the record which contains the data of the file. The data record begins with the colon start character (“:”) followed by the byte count, the address of the first byte and the record type (“00”). Following the record type are the data bytes. The checksum follows the data bytes and is the 2’s compliment of the preceding bytes in the record, excluding the start character. The following are examples of data records (spaces are included for clarity only and should not be found in a real object file).
:10 0000 00 FFFEFDFCFBFAF9F8F7F6F5F4F3F2F1F0 FF :05 0010 00 0102030405 AA
2.2 End Record
Record type 01, the end record, signals the end of the data file. The end record starts with the colon start character (“:”) followed by the byte count (“00”), the address (“0000”), the record type (“01”) and the checksum (“FF”).
:00 0000 01 FF
2.3 Extended Segment Address Record
Record type 02, the extended segment address record, defines bits 4 through 19 of the segment base address. It can appear anywhere within the object file and it affects the absolute memory address of all subsequent data records in the file until it is changed. The extended segment address record starts with the colon start character (“:”) followed by the byte count (“02”), the address (“0000”), the record type (“02”), the 4 character ASCII representation of the hexadecimal number represented by bits 4 through 19 of the segment base address and the 2 character checksum.
:02 0000 02 1000 55
2.4 Start Segment Address Record
Record type 03, the start segment address record, defines bits 4 through 19 of the execution start segment base address for the object file. This record is currently ignored.
:02 0000 03 0000 55
2.5 Extended Linear Address Record
Record type 04, the extended linear address record, defines bits 16 through 31 of the destination address. It can appear anywhere in within the object file and it affects the absolute memory address of all subsequent data records in the file until it is changed. The extended linear address record starts with the colon start character (“:”) followed by the byte count (“02”), the address (“0000”), the record type (“04”),the 4 character ASCII representation of the hexadecimal number represented by bits 16 through 31 of the destination address and the 2 character checksum.
:02 0000 04 FFFF 55
2.6 Start Linear Address Record
Record type 05, the start linear address record, defines bits 16 through 31 of the execution start address for the object file. This record is currently ignored.
:02 0000 05 0000 55
3.0 Example
The following is an example of an Intel Hexadecimal Object file record. It contains the following records: extended linear address,extended segment address, data and end.
:020000040108EA
:020000040108EA
:0200000212FFBD
:0200000212FFBD
:0401000090FFAA5502
:0401000090FFAA5502
:00000001FF
:00000001FF
1. Determine the extended linear address offset for the data record (0108 in this example).
:02 0000 04 0108 EA
2. Determine the extended segment address for the data record (12FF in this example).
:02 0000 02 12FF BD
3. Determine the address offset for the data in the data record (0100 in this example).
:04 0100 00 90FFAA55 02
4. Calculate the absolute address for the first byte of the data record.
0108 0000 linear address offset shifted left 16 bits + 0001 2FF0 segment address offset shifted left 4 bits + 0000 0100 address offset from data record = 0109 30F0 32 bit address for first data byte
To start using Compose, you need to first add some build configurations to your project. Add the following definition to your app’s build.gradle file:
android {

         buildFeatures {
                ///you might have viewbinding or databinding let be like data
                 compose true
         }
         composeOptions {        kotlinCompilerExtensionVersion = "1.5.3"    }
}
Some things to note:
Setting the compose flag to true inside the Android BuildFeatures block enables Compose functionality.
Kotlin Compiler extension versioning defined in the ComposeOptions block is tied to Kotlin versioning. Make sure to consult the Compatibility map and choose a version of the library that matches your project’s Kotlin version.
In addition, add the Compose BOM and the subset of Compose library dependencies you need to your dependencies from the block below:
dependencies {
 def composeBom = platform('androidx.compose:compose-bom:2023.10.00')    implementation composeBom
androidTestImplementation composeBom
// Choose one of the following:
// Material Design 3
implementation 'androidx.compose.material3:material3'
 // or Material Design 2
implementation 'androidx.compose.material:material'
 // or skip Material Design and build directly on top of foundational components
implementation 'androidx.compose.foundation:foundation'
 // or only import the main APIs for the underlying toolkit systems,
// such as input and measurement/layout
implementation 'androidx.compose.ui:ui'
// Android Studio Preview support
implementation 'androidx.compose.ui:ui-tooling-preview'
debugImplementation 'androidx.compose.ui:ui-tooling'
 // UI Tests
androidTestImplementation 'androidx.compose.ui:ui-test-junit4'    debugImplementation 'androidx.compose.ui:ui-test-manifest'
// Optional - Included automatically by material, only add when you need
 // the icons but not the material library (e.g. when using Material3 or a
// custom design system based on Foundation)
implementation 'androidx.compose.material:material-icons-core'
 // Optional - Add full set of material icons
implementation 'androidx.compose.material:material-icons-extended'
// Optional - Add window size utils
implementation 'androidx.compose.material3:material3-window-size-class'
 // Optional - Integration with activities
 implementation 'androidx.activity:activity-compose:1.7.2'
// Optional - Integration with ViewModels
implementation 'androidx.lifecycle:lifecycle-viewmodel-compose:2.6.1'
 // Optional - Integration with LiveData
 implementation 'androidx.compose.runtime:runtime-livedata'
 // Optional - Integration with RxJava
  implementation 'androidx.compose.runtime:runtime-rxjava2'
}
OTG controller detects the state the USB’s fifth pin(ID pin). If the ID-pin is grounded or floating, the connected device is a Host or device.
USB 2.0 spec introduced 3 new protocols, ADP, SRP, HNP. Pls reference HNP for “a way to programmatically switch from host to slave mode and vice versa”.
Android USB Host Mode and USB Accessory Mode are two important features of the Android operating system that allow Android devices to interact with external USB devices.
USB Host Mode:
Definition: USB Host Mode enables an Android device to act as a host or controller for other USB devices. In this mode, the Android device takes on the role of the primary controller, powering and managing the connected USB peripherals.
Usage: This mode is commonly used when you want to connect USB peripherals such as keyboards, mice, USB flash drives, or external hard drives to your Android device. The Android device can communicate with and control these peripherals.
Implementation: Developers can access USB Host Mode through the Android USB Host API. They can use this API to enumerate and communicate with connected USB devices.
USB Accessory Mode:
Definition: USB Accessory Mode allows an Android device to act as a peripheral device or accessory when connected to a host device. In this mode, the Android device provides specific functions or services to the host, rather than controlling other devices.
Usage: USB Accessory Mode is often used in scenarios where you want your Android device to offer specific functionalities to a host device, like a computer. For example, when you connect your Android smartphone to a computer via USB, it might enter accessory mode to enable file transfer, tethering, or other functions.
Implementation: Developers can implement USB Accessory Mode using the Android USB Accessory API. They can specify how the Android device should behave when connected to a host and define the communication protocols for the accessory mode.
In summary, USB Host Mode allows your Android device to control and communicate with external USB devices, while USB Accessory Mode allows your Android device to act as a peripheral and offer specific functions to a host device. These modes extend the versatility and utility of Android devices by enabling them to interact with a wide range of USB peripherals and host devices.
ProgressDialogBinding this name has come from the layout progressdialog.xml or progress_dialog.xml or progress_Dialog.xml or progressDialog.xml in my case it was progress_dialog.xml
val progressDialogBinding=ProgressDialogBinding.inflate(LayoutInflater.from(context))
or
val progressDialogBinding=ProgressDialogBinding.bind(binding.root)
You can use this in fragments or activities especially for the include layout when no id is given, the best is you give id to it. It’s easy and handy
bind will return null so handle when that view is not present in some layout but present in most example base fragment class.
while giving id give camel case name only don’t use _ this it will make life easy.
In fragment viewbinding
class ProgressDialog : DialogFragment() {
    private var _binding:ProgressDialogBinding?=null
    private val binding get() = _binding!!
    override fun onCreateView(inflater: LayoutInflater, container: ViewGroup?, savedInstanceState: Bundle?): View? {

        _binding= ProgressDialogBinding.inflate(inflater, container, false)
        return binding.root
    }

 override fun onDestroyView() {
        super.onDestroyView()
        _binding=null
    }
}
Jetpack is a suite of libraries, tools, and guidance to help developers write high-quality apps easier. These components help you follow best practices, free you from writing boilerplate code, and simplify complex tasks, so you can focus on the code you care about.
Jetpack comprises the androidx.* package libraries, unbundled from the platform APIs. This means that it offers backward compatibility and is updated more frequently than the Android platform, making sure you always have access to the latest and greatest versions of the Jetpack components.
Our official AARs and JARs binaries are distributed through Google Maven.
Adding new tests to the area that is not currently covered by tests
New features to existing libraries if the feature request bug has been approved by an AndroidX team member.
We are not currently accepting new modules.
Checking Out the Code
NOTE: You will need to use Linux or Mac OS. Building under Windows is not currently supported.
Install repo (Repo is a tool that makes it easier to work with Git in the context of Android. For more information about Repo, see the Repo Command Reference)
Now your repository is set to pull only what you need for building and running AndroidX libraries. Download the code (and grab a coffee while we pull down the files):
repo sync -j8 -c
You will use this command to sync your checkout in the future – it’s similar to git fetch
Using Android Studio
To open the project with the specific version of Android Studio recommended for developing:
cd path/to/checkout/frameworks/support/
ANDROIDX_PROJECTS=MAIN ./gradlew studio
and accept the license agreement when prompted. Now you’re ready to edit, run, and test!
You can also the following sets of projects: ALL, MAIN, COMPOSE, or FLAN
If you get “Unregistered VCS root detected” click “Add root” to enable git integration for Android Studio.
If you see any warnings (red underlines) run Build > Clean Project.
Builds
Full Build (Optional)
You can do most of your work from Android Studio, however you can also build the full AndroidX library from command line:
cd path/to/checkout/frameworks/support/./gradlew createArchive
Testing modified AndroidX Libraries to in your App
You can build maven artifacts locally, and test them directly in your app:
./gradlew createArchive
And put the following at the top of your ‘repositories’ property in your projectbuild.gradle file:
NOTE: In order to see your changes in the project, you might need to clean your build (Build > Clean Project in Android Studio or run ./gradlew clean).
Continuous integration
Our continuous integration system builds all in progress (and potentially unstable) libraries as new changes are merged. You can manually download these AARs and JARs for your experimentation.
Running Tests
Single Test Class or Method
Open the desired test file in Android Studio.
Right-click on a test class or @Test method name and select Run FooBarTest
Full Test Package
In the project side panel open the desired module.
Find the directory with the tests
Right-click on the directory and select Run androidx.foobar
Running Sample Apps
The AndroidX repository has a set of Android applications that exercise AndroidX code. These applications can be useful when you want to debug a real running application, or reproduce a problem interactively, before writing test code.
These applications are named either <libraryname>-integration-tests-testapp, or support-\*-demos (e.g. support-v4-demos or support-leanback-demos). You can run them by clicking Run > Run ... and choosing the desired application.
Password and Contributor Agreement before making a change
Before uploading your first contribution, you will need setup a password and agree to the contribution agreement:
Sign in into your account (or create one if you do not have one yet)
Add an appropriate reviewer (use git log to find who did most modifications on the file you are fixing or check the OWNERS file in the project’s directory)
Handling binary dependencies
AndroidX uses git to store all the binary Gradle dependencies. They are stored in prebuilts/androidx/internal and prebuilts/androidx/external directories in your checkout. All the dependencies in these directories are also available from google(), jcenter(), or mavenCentral(). We store copies of these dependencies to have hermetic builds. You can pull in a new dependency using our importMaven tool.
If you’re developing Android apps, you might often wonder how does our PC communicate with the Android devices when we debug. Well, the answer is through the Android Debug Bridge, adb for short. When you run your app, the computer install the debug apk with adb install and launch the app with adb am start (am stands for activity manager more on that belows). But there’s more to adb than that meets the eyes, in fact, some of the commands can help your day-to-day activities.
Installing ADB
First thing first, try running adb in your terminal to make sure it’s installed on your system. If you see something along the line of command not found, that means adb is not installed yet. For MacOS, running brew install android-platform-tools should be okay. For the rest (and for MacOS as well if you prefer manual) you can follow these steps
We will have to reload the shell (close and open terminal) afterwards.Then try running adb again. If it works, then we can continue ahead to explore some of its usefulness.
Setting up Physical device Debugging
If you’re using a physical device, you will need to enable USB debugging in the device. First, enable Developer Options by going into System => About, and tap Build Number seven times. Some devices has different ways to enable Developer Options, so Google for your device if the common step doesn’t work. Afterwards, go into Developer Options and enable “USB Debugging“.
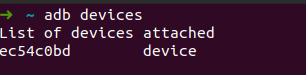
Then, plug your device into your PC and execute adb devices in the terminal. See if your device name pops up.
It should shows up like this
If it doesn’t, it could either be your PC not recognizing your device (especially on Windows where you will need a driver) or USB Debugging has not been enabled. If this is your first time connecting through adb, you might also need to authorize your PC in your Android device which should shows up with a pop-up dialog. Don’t worry, you can revoke the access in Developer Options later. If your device is showing up after adb devices, then we can proceed.
If you want to go one step further, we can setup in a way USB cable is obsolete. You can enable Wireless ADB Debugging in Developer Options. After that,
Connect your device to PC with USB
Run adb tcpip 5555 to make it listen to port 5555.
Run adb shell netcfg or adb shell ifconfig to see your Android device’s IP
Disconnect USB
Run adb connect $DEVICE_IP:5555 to connect to your device wirelessly
Make sure to run adb usb after as leaving it open in the (especially public) network is dangerous
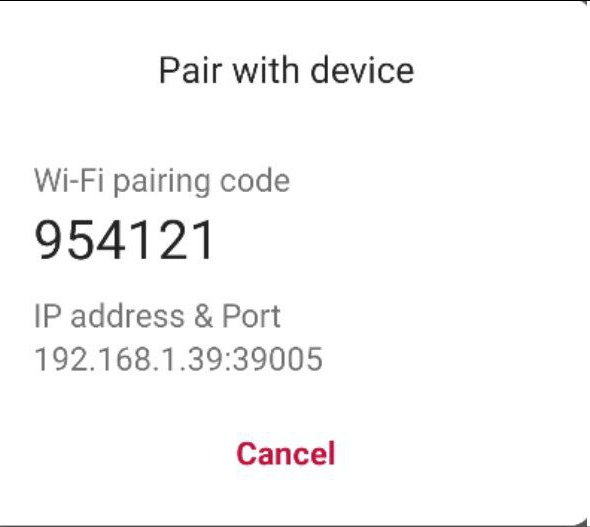
On Android 11 and above, Android now has a function to make wireless debugging easier where a device can pair wirelessly with pairing code or QR code without the need of plugging into the PC for the first time. Tap on Wireless Debugging and it will shows you a similar screen as follows:
Tap on “Pair device with pairing code and you will see a popup similar to the one below:
Go to terminal and run adb pair $DEVICE_IP_AND_PORT $PAIRING_CODE. And it should connect your phone.
~ adb pair 192.168.1.39:39005 954121
Successfully paired to 192.168.1.39:39005 [guid=adb-ec54c0bd-nyDhpf]
Push & Pull files
If you ever been on a Mac, you would be familiar with Android File Transfer. And for Linux and Windows, we can manually find the file and copy paste it onto our computer. However, I prefer transferring file through adb since it saves me the hassle of having to connect with USB.
If we want to transfer from my PC to the device, we can utilize adb push command.
adb push $FILE_IN_YOUR_PC$ $PATH_IN_YOUR_DEVICE$
For example, if I want to push a document into device, I can run
adb push ~/document.txt /sdcard/document.txt
Reversibly, We can execute adb pull for transferring from device to PC.
With adb, you don’t need to use cables, emails, AirDroid or any other tools for you to transfer to/from your device again.
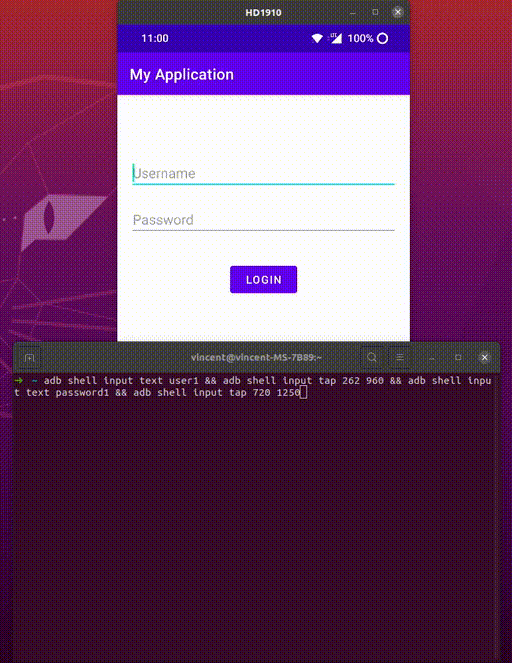
Automating login
adb can also be used to automate filling forms when you’re doing manual testing. adb allows you to send input commands to the device. These inputs could be either just tapping, typing text or sending a key event like ENTER, TAB etc. Let’s take a look into this scenario where I would need to type user1 and password1 .
Example Login
We can input text onto the username or password fields with the following command
adb shell input text $YOUR_TEXT$
adb shell input text user1 && adb shell input text password1
If you run the command in the terminal, you will see that it’s not exactly right. password1 is being appended after the end of user1. That’s because we haven’t shift the focus of the text input yet. We have to switch it from username input to password input. To do this, assuming you have proper nextFocus attributes in your inputs, we can send a TAB_EVENT to the device to switch between inputs. You can find all the possible input event codes here and if you scroll down, you will see KEYCODE_TAB is set to 61. For key event, we have to use input keyevent $KEY_EVNET_CODE. It would looks like this
adb shell input keyevent 61
If we combine all of these, we will have the following one liner that will automatically type the credentials for our testing account
adb shell input text user1 && adb shell input keyevent 61 && adb shell input text password1
✨✨✨
If you have captured the ENTER key event to start login, we can even use input keyevent 66 to press Enter, and start login with zero manual tap.
Personally, I make an alias for repeated form filling in my shell config because it reduces time for me during manual tests. Plus, it looks like magic in presentations and demos when you see a small command like testAccountLogin being executed and everything just works.
alias testAccountLogin = adb shell input text user1 && adb shell input keyevent 61 && adb shell input text password1
I have said that the above example assumed that you have proper nextFocus attributes in your inputs. But what if you’re testing for a third-party app and the app doesn’t really has proper nextFocus? How do we automate switching between the inputs? No worries, we can still use input tap $X_VALUE $Y_VALUE to tap the screen. There’s two ways, the first one involve
Run adb shell getevent -l in the terminal to log the input events
Manually press your input field
Check if there’s ABS_MT_POSITION_X and ABS_MT_POSITION_Y in the terminal
Copy the value (they should be in hexadecimal)
Convert the values into decimal value
Run adb shell input tap $DECIMAL_X $DECIMAL_Y to see if it’s click on the input field
This involves some complex steps, so, I prefer to use more straightforward way.
Open Developer Options
Enable Input > Pointer Options
Check if you can see numbers at the top of the screen
Hold your finger or put the cursor over the input field
Copy the x, y value (usually at top left corner of the screen)
Run adb shell input tap $dx $dy to see if it’s click on the input field
In our example, I can also use tap command to do the same thing
adb shell input text user1 && adb shell input tap x y && adb shell input text password1
This works for anything on the screen, including buttons. A full command that includes tapping loign button would be as follows:
adb shell input text user1 && adb shell input tap x y && adb shell input text password1 && adb shell input tap x y
With tap instead of key event
adb shell input tap 300 700 – Inputs a tap event at the specific coordinates in pixels. In this case, 300 is the x value and 700 is the y value.
adb shell input swipe 540 1600 540 100 1500 – Inputs a swipe gesture starting at a set of coordinates, ending at another set of coordinates. In this case, 540 is the start x value, 1600 is the start y value, 540 is the end x value, 100 is the end y value, and 1500 is the time in milliseconds the swipe will take. On both a physical device and the emulator I have found that swipe inputs that are under 1500 milliseconds produce inconsistent results. This is important because when chaining multiple inputs together (more on this below), if one of them is off, the whole chain is broken.
adb shell input text 'Leon' – Inputs text.
adb shell input keyevent 66 – Inputs enter.
adb shell input keyevent 19 – Inputs a D-pad up event, useful for changing the focus to a different view.
adb shell input keyevent 20 – Inputs a D-pad down event, useful for changing the focus to a different view.
adb shell input keyevent 21 – Inputs a D-pad left, useful for changing the focus to a different view.
adb shell input keyevent 22 – Inputs a D-pad right event, useful for changing the focus to a different view.
sleep 1 – Pauses execution for a specified amount of seconds. In this case, execution would pause for one second. Though this is not an adb command (it’s a shell command), it is useful for waiting for an animation to complete or data to be received from the server, before continuing with other adb inputs.
adb shell input keyevent 26 -To simulate pressing the hardware power key
adb shell input keyevent POWER
adb shell input keyevent CAMERA
Even if you don’t have a hardware key you still can use a keyevent to perform the equivalent action
adb shell input tap 750 300                 # tap search bar
sleep 1                                     # wait for load
adb shell input text 'echo'                 # input search
adb shell input keyevent 66                 # executue search
sleep 2                                     # wait for search to load
adb shell input tap 700 800                 # tap product
sleep 4                                     # wait for load
adb shell input tap 740 2200                # tap color options
sleep 1                                     # wait for load
adb shell input tap 820 1460                # tap white
sleep 1                                     # wait for load
adb shell input tap 1290 960                # tap done
sleep 1                                     # wait for load
adb shell input swipe 540 1600 540 100 1500 # scroll down
adb shell input swipe 540 1600 540 100 1500 # scroll down
adb shell input tap 720 800                 # add to cart
sleep 1                                     # wait for load
adb shell input tap 1350 150                # open cart
sleep 2                                     # wait for load
adb shell input tap 800 480                 # start checkout
adb shell input text "We\ are\ the\ best\!" # Inputs text with ""
adb shell input text 'this%sis%san%sexample' # Input text with ''
Screenshot and video record
Another common task is taking screenshots and recording video. These are useful when you want to report an issue and want to show the replication steps clearly. Let’s start with screenshot first.
adb shell screencap $PATH_IN_DEVICE
For example, we can run adb shell screncap /sdcard/our_screencap.png. We can then execute adb pull /sdcard/our_screencap.png to pull the screenshot into our PC.
For video recording, we can execute
adb shell screenrecord $PATH_IN_DEVICE
When we’re done recording, we can press Ctrl+C (or Command+C on MacOS) to stop the recording. Similar to above, we can also run adb pull to pull the file onto our development PC after recording. Additionally, we can provide options such as resolution, bitrate, time etc. You can browse these options here. Do note that there are limitation to this approach such as you cannot rotate the screen during recording and that audio won’t be captured.
Testing DeepLinks
Deep links are one of those few things tedious to test because manually, you have to click on the links in some third party app to see if your app is correct in handling the links. We can remove this need of third party apps by testing this function through the use of adb. As mentioned in this documentation, you can run the following command
adb shell am start
        -W -a android.intent.action.VIEW
        -d <URI> <PACKAGE>

adb shell am start
        -W -a android.intent.action.VIEW
        -d "example://gizmos" com.example.android
To break this command down,
am means activity manager. To make it simple, in Android, each app has an activity or multiple activities that hosts the UI that the user can see. Activity Manager knows which apps has which activities and we can launch specific screen/activity through the activity manager.
-W means wait for the launch to be completed.
-a android.intent.action.VIEW is where we specify the action that we want to execute. In Android, we have predefined actions that the OS understand and the OS can use this information to route the acti0n to the corresponding apps. If you ever open a file and wonder where all of these apps are coming from in the popup, then the answer is through this OS feature. The OS knows which app can handle which file, i.e, which action.
-d <URI> <PACKAGE> : destination specify two parameters, first is our deep link uri, and the second one is the app we want to view this deeplink on. For the first one, replace with the link you want to test, and for the second, you can enter your app’s package name.
If you run that command, the OS should launch your app. First, OS will first ask the app if it can handle this type of deep link. If the app can handle the deep link, it will receive the deeplink, and now the app is responsible for dissecting the deep link and manage it.
The complexity of an algorithm can broadly fall into the following three categories:
“Best case analysis: Best case defines the minimum time required by an algorithm to produce the output. It’s also represented as Omega notation (Ω).
Average case analysis: Average case defines the average time required by an algorithm to produce the output for different sized input. It’s also represented as Theta notation (θ).
Worst case analysis: Worst case defines the maximum time required by an algorithm to produce the output. It’s also represented as a Big O notation (O).”
“O(n) > θ(n)>Ω(1)”
val x = 10
val y = x * 2
for (i in 0..y) {
    if (i % 2 == 0) {
        println(“$i is Even”)
    } else {
        println(“$i is Odd”)
    }
}
“Let’s break down the code to understand it better, as follows:
The first line, val x = 10, requires one instruction, that is, assigning the value 10 to x.”
“The second line, val y = x * 2, requires three instructions. The first instruction is to look for x, the second instruction is to multiply it by 2, and the third instruction is to assign the result to y.”
“The third line, for (int i = 0; i < y; i++), will run two more instructions in the first iteration of the loop. One is the assignment instruction, i = 0, and the other one is the comparison instruction, i < y. After the first iteration, there are two more further iterations, that is, i++ and i < y. So the total for instructions here is 4n.”
“From the fourth line onward (the body of the for loop), for every iteration, the body will run a few more instructions, such as i % 2 and result is 0 and then, based on output, print instruction. Moreover, the print instruction is dependent on the result of a condition that itself depends on the condition of the for loop. So the total for instructions here is 2n (mod and comp) + 2n (concat and print) = 4n. Note that the counting of instructions might not be accurate; we’re doing it to understand the process. For example, string concat might not be a single instruction. Similarly, printing to console also might have multiple instructions. But we’re considering those as one instruction to understand them better.”
“For example, instead of saying the complexity of the preceding algorithm is f(n) = 1 + 3 + 4n + 4n = 4 + 8n, we can simplify it further.”
“f(n) = 4 + 8n, it’s clear that 4 and 8 never change, so by ignoring those, we can conclude f(n) = n. ”
Asymptotic behavior
“those factors that change based on the input. This is what we call asymptotic behavior.”
“Let’s see some examples:
f(n) = 3n + 5 can be considered f(n) = n”
“f(n) = 5 can be considered f(n) = 1 f(n) = n2 + 3n + 5 can be considered f(n) = n2
In simple terms, we can summarize the asymptotic behavior of an algorithm as follows:
Any program that doesn’t have any loop has f(n) = 1. Any program with one for loop has f(n) = n. Any program with one nested for loop (for loop inside another for loop) has f(n) = n2.”
SOLID is a mnemonic acronym that helps define the five basic object-oriented design principles:
Single Responsibility Principle
Open-Closed Principle
Liskov Substitution Principle
Interface Segregation Principle
Dependency Inversion Principle
SOLID #1: The Single Responsibility Principle (SRP)
A class should have one, and only one, reason to change.
for more details, let’s assume we need an adapter of Recyclerview, as you probably already knowan adapter takes the data from the data set and adapts it to a view. An implementation I’ve seen could look like this:
// violation of single responsibility principle
public class MovieRecyclerAdapter extends RecyclerView.Adapter<MovieRecyclerAdapter.ViewHolder>{private List<Movie> movies;
private int itemLayout;
public MovieRecyclerAdapter(List<Movies> movies,int itemLayout)
{this.movies = movies;
this.itemLayout = itemLayout;
}@Overridepublic ViewHolder onCreateViewHolder(ViewGroup parent,int viewType){View v = LayoutInflater.from(parent.getContext())
.inflate(itemLayout, parent, false);
return new ViewHolder(v);
}@Overridepublicvoid onBindViewHolder(ViewHolder holder,int position){final Movie movie = movies.get(position);
holder.itemView.setTag(movie);
holder.title.setText(movie.getTitle());
holder.rating.setText(movie.getRating());
String genreStr = "";
for (String str: movie.getGenre()) {
genreStr += str + ", ";
}
genreStr = genreStr.length() > 0 ?
genreStr.substring(0, genreStr.length() - 2) : genreStr;
holder.genre.setText(genreStr);
holder.releaseYear.setText(movie.getYear());
Glide.with(holder.thumbNail.getContext())
.load(movies.get(position)
.getThumbnailUrl())
.into(holder.thumbNail);
}@Override
publicint getItemCount(){return movies.size();}publicstaticclassViewHolderextends RecyclerView.ViewHolder {@Bind(R.id.title) TextView title;
@Bind(R.id.rating) TextView rating;
@Bind(R.id.genre) TextView genre;
@Bind(R.id.releaseYear) TextView releaseYear;
@Bind(R.id.thumbnail) ImageView thumbNail;
public ViewHolder(View itemView){super(itemView);
ButterKnife.bind(this, itemView);
}}}
The code above violates the Single Responsibility Principle. Coz the adapter’s onBindViewHolder method is not only mapping from an Movie object to the view, but is also performing data formatting as well. This violates the Single Responsibility Principle. The adapter should only be responsible for adapting an order object to its view representation. The onBindViewHolder is performing extra duties that it should not be. An updated onBindViewHolder method could look like this:
// single responsibility principle - Fix it example
public class MovieRecyclerAdapter extends RecyclerView.Adapter<MovieRecyclerAdapter.ViewHolder>{private List<Movie> movies;
private int itemLayout;
public MovieRecyclerAdapter(List<Movie> movies,int itemLayout)
{this.movies = movies;
this.itemLayout = itemLayout;
}@Overridepublic ViewHolder onCreateViewHolder(ViewGroup parent,int viewType){View v = LayoutInflater.from(parent.getContext())
.inflate(itemLayout, parent, false);
return new ViewHolder(v);
}@Overridepublicvoid onBindViewHolder(ViewHolder holder,int position){final Movie movie = movies.get(position);
holder.itemView.setTag(movie);
holder.title.setText(movie.getTitle());
holder.rating.setText(movie.getRating());
holder.genre.setText(
ArraysUtil.convertArrayListToString(movie.getGenre()));
holder.releaseYear.setText(movie.getYear()); Glide.with(holder.thumbNail.getContext())
.load(movies.get(position)
.getThumbnailUrl())
.into(holder.thumbNail);
}@Override
publicint getItemCount(){return movies.size();}publicstaticclassViewHolderextends RecyclerView.ViewHolder {@Bind(R.id.title) TextView title;
@Bind(R.id.rating) TextView rating;
@Bind(R.id.genre) TextView genre;
@Bind(R.id.releaseYear) TextView releaseYear;
@Bind(R.id.thumbnail) ImageView thumbNail;
public ViewHolder(View itemView){super(itemView);
ButterKnife.bind(this, itemView);
}}}
As Uncle Bob said:
In the context of the Single Responsibility Principle (SRP) we define a responsibility as “a reason for change”. If you can think of more than one motive for changing a class, then that class has more than one responsibility.
SOLID #2: The Open-Closed Principle (OCP)
Software entities (classes, modules, functions, etc…) should be open for extension, but closed for modification
What we are basically talking about here is to design our modules, classes and functions in a way that when a new functionality is needed, we should not modify our existing code but rather write new code that will be used by existing code. let’s dive to it, and show some code:
// violation of Open closed principle // Rectangle.java publicclassRectangle{ privatedouble length; privatedouble height; // getters/setters ... }// Circle.java publicclassCircle{ privatedouble radius; // getters/setters ... }// AreaFactory.java publicclassAreaFactory{ publicdouble calculateArea(ArrayList<Object>... shapes){ double area = 0; for(Object shape : shapes){ if(shape instanceof Rectangle){ Rectangle rect =(Rectangle)shape; area +=(rect.getLength()* rect.getHeight()); }elseif(shape instanceof Circle){ Circle circle =(Circle)shape; area += (circle.getRadius()* cirlce.getRadius()* Math.PI); }else{ thrownew RuntimeException("Shape not supported"); } } return area; } }
As we see above, this code smell like if we have a shape like Triangle or any other polygone, we’re going to be modifying the AreaFactory class over and over. And that’s violate the open closed principle. It is not closed for modification and it is not open to extension. And that’s really bad, so let’s fix that:
Now, if we need to add a new shape, the AreaFactory will not need to be changed because it is open for extension through the Shape interface.
SOLID #3: The Liskov Substitution Principle (LSP)
Child classes should never break the parent class’ type definitions.
As simple as that, a subclass should override the parent class’ methods in a way that does not break functionality from a client’s point of view. Here is a simple example to demonstrate the concept.
// violation of Liskov's Substitution principle// Car.java public interface Car { public void startEngine(); }// Ferrari.javapublicFerrari implements Car { ... @Override publicdouble startEngine(){ //logic ... } } // Tesla.javapublicTesla implements Car{ ... @Override publicdouble startEngine(){ if (!IsCharged) return; //logic ... } }// Make the call public void letStartEngine(Car car) { car.startEngine(); }
As you can see in the code above, there are two classes of cars. One fuel car and one electric car. The electric car can only start if it’s charged .The LetStartEngine method will not work if a car is electric and not charged. This breaks the LSP principle since it must be Charged to be able to start as the IsCharged (which also is part of the contract) won’t be set as in the base class.
To solve this you can do something like this:
// Make the call
public void LetStartEngine(Car car) {  if (car instanceof Tesla)
       ((Tesla)car).TurnOnCar();
   car.startEngine();
}
But this violates the Open/Closed Principale, so the proper way is to automatically turn on the car in the StartEngine method like below:
// Fix of Liskov's Substitution principlepublic interface Car { public void startEngine(); }// Ferrari.javapublicFerrari implements Car { ... @Override publicdouble startEngine(){ //logic ... } } // Tesla.javapublicTesla implements Car{ ... @Override publicdouble startEngine(){ if (!IsCharged) TurnOnCar(); //logic ... } }// Make the call public void letStartEngine(Car car) { car.startEngine(); }
SOLID #4: The Interface Segregation Principle (ISP)
The interface-segregation principle (ISP) states that no client should be forced to depend on methods it does not use.
This principale states that once an interface becomes too fat, it needs to be split into smaller interfaces so that client of the interface will only know about the methods that pertain to them. As you know, the Android View class is the root superclass for all Android views. You name it, if it’s a Button, the root superclass is View. Let’s dive to it, and show some code:
know we can use the interface without implement some messy methods.
SOLID #5: The Dependency Inversion Principle (DIP)
1. High-level modules should not depend on low-level modules. Both should depend on abstractions. 2. Abstractions should not depend upon details. Details should depend upon abstractions.
Let’s start from the code. Many of us probably seen (or written) code like this:
// violation of Dependency's inversion principle// Program.java
class Program {

    public void work() {
     // ....code
 }
}

// Engineer.java

class Engineer{

 Program program;

    public void setProgram(Program p) {
      program = p;
    }

   public void manage() {
       program.work();
 }
}
The problem with the above code is that it breaks the Dependency Inversion Principle ; namely item (1.) from above: High-level modules should not depend on low-level modules. Both should depend on abstractions. We have the Engineer class which is a high level class, and the low level class called Program.
Let’s assume the Engineer class is quite complex, containing very complex logic. And now we have to change it in order to introduce the new SuperProgram. Let’s see the disadvantages:
we have to change the Engineer class (remember it is a complex one and this will involve time and effort to make the changes).
some of the current functionality from the engineer class might be affected.
the unit testing should be redone.
// Dependency Inversion Principle - Good example
interface IProgram {
  public void work();
}

class Program implements IProgram{
 public void work() {
     // ....code
 }
}

class SuperProgram implements IProgram{
 public void work() {
     //....code
  }
}

class Engineer{
    IProgram program;

    public void setProgram(IProgram p) {
      program = p;
    }

   public void manage() {
       program.work();
 }
}
In this new design a new abstraction layer is added through the IProgram Interface. Now the problems from the above code are solved(considering there is no change in the high level logic):
Engineer class doesn’t require changes when adding SuperProgram.
Minimized risk to affect old functionality present in Engineer class since we don’t change it.
No need to redo the unit testing for Engineer class.
Welcome to the final segment of the SOLID Principles for Android Developer series. We’ve made it to the end, and today I’m going to cover the last letter the SOLID pneumonic acronym, D: The Dependency Inversion Principle (DIP).
If you missed the first four articles, you can easily catch up here:
So without further ado, our fifth and final principle –
The Dependency Inversion Principle states that we as developers should follow two pieces of advice:
a. High-level modules should not depend on low-level modules. Both should depend on abstractions.
and
b. Abstractions should not depend on details. Details should depend on abstractions.
Put succinctly, the Dependency Inversion Principle basically says this:
Depend on Abstractions. Do not depend on concretions.
Migrating to support the Dependency Inversion Principle
In order to fully grok what this principle is dictating I feel that it’s important to talk about how much of software is built – using a traditional layered pattern. We’ll look at this traditional layered architecture and then talk about how we can make changes to it so that we can support the DIP.
In a traditional layered pattern software architecture design, higher level modules depend on lower level modules to do their job. For example, here’s a very common layered architecture that you may have seen (or may even have in your application now):
Android UI → Business Rules → Data Layer
In the diagram above there are three layers. The UI Layer (in this case, the Android UI) – this is where all of our UI widgets, lists, text views, animations and anything Android UI-related lives. Next, there is the business layer. In this layer, common business rules are implemented to support the core application functionality. This is sometimes also known as a “Domain Layer” or “Service Layer.” Finally, there is the Data Layer where all the data for the application resides. The data can be in a database, an API, flat files, etc – it’s just a layer whose sole responsibility is to store and retrieve data.
Get more development news like this Subscribe Comments
Let’s assume that we have an expense tracking application that allows users to track their expenses. Given the traditional model above, when a user creates a new expense we would have three different operations happening.
UI Layer: Allows user to enter data.
Business Layer: Verifies that entered data matches a set of business rules.
Data Layer: Allows for persistent storage of the expense data.
In regards to code, this might look like this:
// In the Android UI layer
findViewById(R.id.save_expense).setOnClickListener(new View.OnClickListener() {
    public void onClick(View v) {
        ExpenseModel expense = //... create the model from the view values
        BusinessLayer bl = new BusinessLayer();
        if (bl.isValid(expense)) {
           // Woo hoo! Save it and Continue to next screen/etc
        } else {
           Toast.makeText(context, "Shucks, couldnt save expense. Erorr: " + bl.getValidationErrorFor(expense), Toast.LENGTH_SHORT).show();
        }
    }
});
In the business layer we might have some code that resembles this pseudo code:
// in the business layer, return an ID of the expense
public int saveExpense(Expense expense) {
    // ... some code to check for validity ... then save
    // ... do some other logic, like check for duplicates/etc
    DataLayer dl = new DataLayer();
    return dl.insert(expense);
}
The problem with the above code is that it breaks the Dependency Inversion Principle – namely item (a) from above: High-level modules should not depend on low-level modules. Both should depend on abstractions. The UI is depending upon a concrete instance of the business layer with this line:
BusinessLayer bl = new BusinessLayer();
This forever ties the Android UI layer to the business layer, and the UI layer won’t be able to do its job without the business layer.
The business layer also violates DIP, because it is depending upon a concrete implementation of the data layer with this line:
DataLayer dl = new DataLayer();
How would one go about breaking this dependency chain? If the higher-level modules should not depend on lower-level modules then how can an app do its job?
We definitely don’t want a simple monolith class that does everything. Remember, we still want to adhere to the first SOLID principle too – the Single Responsibility Principle.
Thankfully we can rely on abstractions to help implement these small seams in the application. These seams are the abstractions that allow us to implement the Dependency Inversion Principle. Changing your application from a traditional layered implementation to a dependency inverted architecture is done through a process known as Ownership Inversion.
Implementing Ownership Inversion
Ownership inversion does not mean to flip this on its head. We definitely don’t want lower-level modules depending on higher-level modules either. We need to invert this relationship completely, from both ends.
How can this be done? With abstractions.
With the Java language, there are a couple ways we can create abstractions, such as abstract classes or interfaces. I prefer to use interfaces because it creates a clean seam between application layers. An interface is simply a contract that informs the consumer of the interface of all the possible operations an implementor may have.
This allows each layer to rely on an interface, which is an abstraction, rather than a concrete implementation (aka: a concretion).
Implementing this is fairly easy in Android Studio. Let’s assume that you have That DataLayer class and it looks like this:
Since we want to depend an abstraction, we need to extract an interface off of the class. You can do that like this:
Now you have an interface you can use to depend on! However, it still needs to be utilized because the business layer still depends on the concrete data layer. Going back to the business layer, you can change that code to have the dependency injected through the constructor like this:
public class BusinessLayer {

    private IDataLayer dataLayer;

    public BusinessLayer(IDataLayer dataLayer) {
        this.dataLayer = dataLayer;
    }

    // in the business layer, return an ID of the expense
    public int saveExpense(Expense expense) {
        // ... some code to check for validity ... then save
        // ... do some other logic, like check for duplicates/etc
        return dataLayer.insert(expense);
    }
}
The business layer now depends upon an abstraction – the IDataLayer interface. The data layer is now injected via the constructor via what is known as “Constructor Injection”.
In plain English this says “In order to create a BusinessLayer object, it will create an object that implements IDataLayer. It does not care who implements it, it just needs an object that implements that interface.”
So where does this data layer come from? Well, it comes from whoever creates the Business Layer object. In this case, it would be the Android UI. However, we know that our previous example illustrates that the Android UI is tightly coupled to the business layer because it is creating a new instance. We need the business layer to also be an abstraction.
At this point I would perform the same Refactor–>Extract–>Extract Interface steps that I did in the prior example. This would create a IBusinessLayer interface that my Android UI could rely on, like this:
// This could be a fragment too ...
public class MainActivity extends AppCompatActivity {

    IBusinessLayer businessLayer;

    @Override
    protected void onCreate(Bundle savedInstanceState) {
        super.onCreate(savedInstanceState);
        setContentView(R.layout.activity_main);
    }
}
Finally, our higher-level modules are relying on abstractions (interfaces). Furthermore, our abstractions are not depending on details, they’re also depending upon abstractions.
Remember, the UI layer is depending upon the business layer interface, and the business layer interface is depending on the data layer interface. Abstractions everywhere!
Wiring it together in Android
Herein lies the rub. There’s always an entry point to an application or screen. In Android, that’s typically the Activity or Fragment class (the Application object is not a valid use case here because we may only want our objects to be active during a particular screen session). You’re probably wondering – How do I rely on an abstraction in the Android UI layer if this is the top layer?
Well, there are a couple ways you can solve it in Android using a creational pattern such as the factory or factory method pattern, or a dependency injection framework.
I personally recommend using a dependency injection framework to help you create these objects so you don’t have to manually create them. This will allow you to write code that looks like this:
public class MainActivity extends AppCompatActivity {

    @Inject IBusinessLayer businessLayer;

    @Override
    protected void onCreate(Bundle savedInstanceState) {
        super.onCreate(savedInstanceState);
        setContentView(R.layout.activity_main);

        // businessLayer is null at this point, can't use it.
        getInjector().inject(this); // this does the injection
        // businessLayer field is now injected valid and NOT NULL, we can use it

        // do something with the business layer ...
        businessLayer.foo()
    }
}
I personally recommend using Dagger as your dependency injection framework. There are various tutorials and video lessons on how to set up dagger so you can implement dependency injection in your application.
If you don’t use a creational pattern or dependency injection framework you’ll be left writing code that looks like this:
public class MainActivity extends AppCompatActivity {

    IBusinessLayer businessLayer;

    @Override
    protected void onCreate(Bundle savedInstanceState) {
        super.onCreate(savedInstanceState);
        setContentView(R.layout.activity_main);

        businessLayer = new BusinessLayer(new DataLayer());
        businessLayer.foo()
    }
}
While this may not look too bad at this time, you’ll eventually find that your object graph will grow to be quite large, and instantiating objects this way is very error-prone and breaks many of the SOLID principles. Plus, it makes your application more brittle as changes to the code can wreak havoc on your app. Ultimately, without a creational pattern or dependency injection framework, your Android UI still will not adhere to the DIP.
Patterns for Separating Interfaces
There are two patterns for separating interfaces. Which one you prefer is up to you.
Keeping the interfaces close to the classes that implement them.
Moving the interfaces to their own package.
The benefit of keeping them close to the classes that implement them is the pure simplicity of it. It’s not complicated, and it’s easy to grok. This has a downside though if you need to do some advanced tooling around your interfaces and implementations or if you need to share these interfaces.
The second method is to pull all of your interface abstractions into their own package and have your implementors reference this package to gain access to the interfaces. The pro of this is that it gives you more flexibility, but along with it comes the con of having another package to maintain and possibly another Java module (if you’ve taken it that far). This also increases the complexity. However, sometimes this is needed due to the circumstances of how the app (and its other related dependencies) is built.
Conclusion
The Dependency Inversion Principle is the very first principle I tend to heavily rely on in every single application I write. In every app I develop I end up using a dependency injection framework, such as Dagger, to help create and manage the object lifecycles. Depending on abstractions allows me to create application code that is decoupled, easier to test, more maintainable and enjoyable to work with (this last one is key to your sanity).
I highly recommend (and I mean it with every ounce of my being) that you take the time to learn a tool like Dagger so that you can apply it in your application. Once you fully grok what a tool like Dagger can do for you (or even a creational pattern), then you can truly grasp the power of the Dependency Inversion Principle.
Once you cross the chasm of dependency injection and dependency inversion you’ll wonder how you were ever able to get by without them. Next Up: More Android Learning Paths