Android DataBase Test Case
https://commonsware.com/AndExplore/pages/chap-t26-002
Api testing
JUnit Test
https://www.nerd.vision/post/jacoco-coverage-of-util-classes
https://proandroiddev.com/unit-tests-with-dagger2-retrofit2-rxjava2-and-mockk-android-1c268fa77957
https://www.raywenderlich.com/195-android-unit-testing-with-mockito#toc-anchor-001
Android Unit Testing with Mockito
In this Unit Testing with Mockito tutorial for Android, you will learn how to refactor an app in a way that makes it easy to write unit tests in Kotlin using Mockito. By Fernando Sproviero J
Version
- Kotlin 1.2, Android 4.4, Android Studio 3

The need for writing tests in software development is often underestimated and relegated to later stages of a project. Sometimes not writing any tests is considered right for mobile apps.
You may have heard several excuses, a few of which are:
- “Mobile apps are frontend apps, the real logic is in the backend, so backend apps should be tested instead.”
- “Mobile apps are difficult to unit test, because most of the logic is done in the UI. At most, you should only care about UI tests.”
- “Mobile apps are “simple” or “tiny” compared to backend apps. Thus, effort should be put in the features instead of wasting time making tests.”
Mobile apps are actually becoming larger and more complex. Hence, teams are also growing in size.
Some companies even have separate teams that focus on specific features. And often, there’s another team that has to:
- Merge all the features.
- Upload the final build to Playstore/AppStore.
This increase in code complexity and team collaboration may jeopardize the proper functioning of your application.
Writing good tests can cover this!
In this tutorial, you’ll be refactoring a starter project to use the Model-View-Presenter presentation architecture pattern and write unit tests using Mockito.
But first of all, let’s take a look at the testing pyramid.
Testing pyramid
Tests are typically broken into three different kinds:
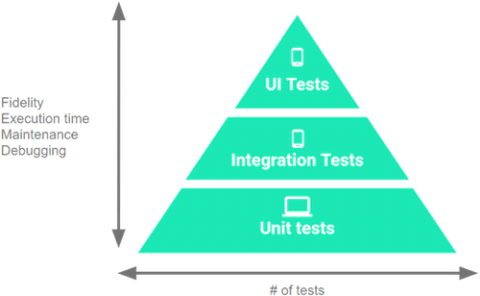
The Testing Pyramid, showing the three categories of tests that you should include in your app’s test suite
- UI Tests:
These tests interact with the UI of your app, they emulate the user behavior and assert UI results. These are the slowest and most expensive tests you can write because they require a device/emulator to run. On Android, the most commonly used tools for UI testing are Espresso and UI Automator. - Integration Tests:
When you need to check how your code interacts with other parts of the Android framework but without the complexity of the UI. These tests don’t require a device/emulator to run. On Android, the most common tool for integration testing is Roboelectric. - Unit Tests:
The system under test (SUT) is one class and you focus only on it. All dependencies are considered to be working correctly (and ideally have their own unit tests :]), so they are mocked or stubbed.
These tests are the fastest and least expensive tests you can write because they don’t require a device/emulator to run. On Android, the most commonly used tools for unit testing are JUnit and Mockito.
A typical rule of thumb is to have the following split among the categories:
- UI Tests: 10%
- Integration Tests: 20%
- Unit Tests: 70%
Because unit tests are so important in the testing pyramid and also easy to write, this tutorial will focus on them.
Note: This tutorial assumes you have previous experience with developing for Android in Kotlin. If you are unfamiliar with the language have a look at this tutorial. If you’re beginning with Android, check out some of our Getting Started and other Android tutorials.
Getting started
Download the starter project. Extract the zip file but don’t open the project in Android Studio yet.
You’ll be working with this simple app named “IngrediSearch” that allows users to search for recipes and favorite them.Note: For this app to work, please ensure the following:
- Get your Food2Fork API key
- Create a keystore.properties file with the following content (including the quotes):
FOOD2FORK_API_KEY="YOUR API KEY" - Place this file in the root project.
With the keystore.properties file added, open the project in Android Studio 3.0.1 or greater.
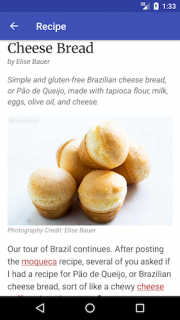
Build and run the project to become familiar with the application features.
 |  |
 |  |
The project contains the following main files:
- MainActivity.kt: Contains the main screen.
- SearchActivity.kt: Allows the user to input ingredients.
- SearchResultsActivity.kt: Searches for recipes using the API and shows the results. It also provides the ability to add or remove favorites.
- RecipeActivity.kt: Shows the recipe detail.
- FavoritesActivity.kt: Shows the list of favorites.
- RecipeRepository.kt: Interacts with the API to search for recipes. It also stores the favorites in SharedPreferences.
- RecipeAdapter.kt: Adapter used to show the list in SearchResultsActivity and FavoritesActivity.
Before you start unit testing, it’s best to ask one very important question…
Is this unit testable?
By checking the source code you will find:
Logic in the Activities
class SearchActivity : ChildActivity() {

  override fun onCreate(savedInstanceState: Bundle?) {
    ...
    searchButton.setOnClickListener {
      // 1
      val query = ingredients.text.toString().trim()
      // 2
      if (query.isBlank()) {
        // 3
        Snackbar.make(searchButton, getString(R.string.search_query_required), Snackbar
            .LENGTH_LONG).show()
      } else {
        // 4
        startActivity(searchResultsIntent(query))
      }
    }
  }
}
When the user clicks the search button:
- Trim the ingredients text string entered by the user.
- Check if it’s blank.
- When it’s blank, then show an error message.
- If it’s not blank, then proceed to the next screen.
Activity doing everything
class SearchResultsActivity : ChildActivity() {

  private fun search(query: String) {
    // 1
    showLoadingView()
    // 2
    repository.getRecipes(query, object : RecipeRepository.RepositoryCallback<List<Recipe>> {
      override fun onSuccess(recipes: List<Recipe>?) {
        if (recipes != null && recipes.isNotEmpty()) {
          // 3
          showRecipes(recipes)
        } else {
          // 4
          showEmptyRecipes()
        }
      }

      override fun onError() {
        // 5
        showErrorView()
      }
    })
  }
To perform a search:
- Because the operation is asynchronous, the activity must show a loading view.
- Call the repository of recipes.
- If there are recipes, show them!
- When no recipes are found, a “No recipes were found” message is shown.
- Show an error view if there was an error fetching the recipes.
Adapter doing too much logic
Inside this same activity, you’ll find:
    list.adapter = RecipeAdapter(recipes, object : RecipeAdapter.Listener {
      override fun onAddFavorite(item: Recipe) {
        // 1
        item.isFavorited = true
        // 2
        repository.addFavorite(item)
        // 3
        list.adapter.notifyItemChanged(recipes.indexOf(item))
      }
      ...
    })
- Altering the model (favorited status).
- Calling the repository.
- Updating the view to show the altered model.
Conclusion
Because these are so embedded into the Android activities/adapter, they are not efficiently unit testable. A refactor must be done!
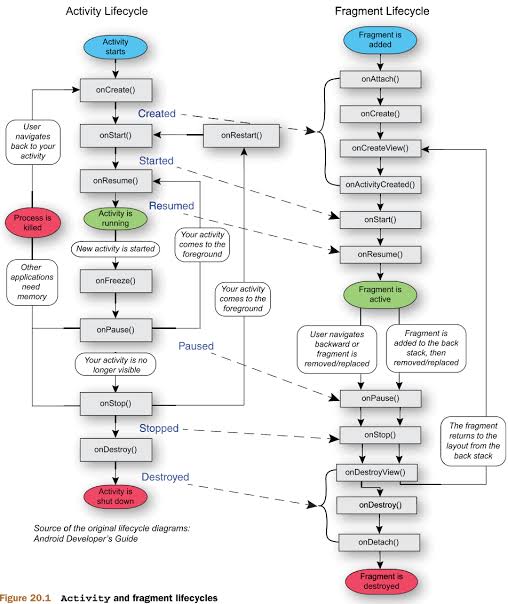
Model-View-Presenter
You’ll refactor the project to the Model-View-Presenter structure. This will ease the creation of unit tests.Note: If you already know about MVP you can skip to the next section where the project is already refactored to MVP and ready to write unit tests.

Also called just MVP
- Model:
All your data classes, API connectors, databases. - View:
Activities, Fragments and any Android Views. It’s responsible for showing the data and propagating the user’s UI actions to the corresponding presenter methods. - Presenter:
Knows about the model and the view. Publishes methods that will be called by the view. These methods usually involve fetching data, manipulating it, and deciding what to show in the view.
Refactoring to MVP
Creating your first Presenter
First, you’ll refactor the SearchActivity to MVP.
Therefore, create a new class by right-clicking on the com.raywenderlich.ingredisearch package and choosing New-Kotlin File/Class. Name the class SearchPresenter and add the following:
class SearchPresenter {
  // 1
  private var view: View? = null

  // 2
  fun attachView(view: View) {
    this.view = view
  }

  // 3
  fun detachView() {
    this.view = null
  }

  // 4
  fun search(query: String) {
    // 5
    if (query.trim().isBlank()) {
      view?.showQueryRequiredMessage()
    } else {
      view?.showSearchResults(query)
    }
  }

  // 6
  interface View {
    fun showQueryRequiredMessage()
    fun showSearchResults(query: String)
  }
}
- The presenter knows about the view, so it has to hold a reference to it.
- When the view is created, it must attach to the presenter.
- You must detach from the presenter when the view is destroyed.
- This presenter exposes the search method.
- If the query is blank then the view has to show a “query required” message. If it’s not blank, it’ll show the results.
- A View interface that your activity will have to conform to.
Implementing your first View
Now, open SearchActivity and modify it to the following:
// 1
class SearchActivity : ChildActivity(), SearchPresenter.View {

  private val presenter: SearchPresenter = SearchPresenter()

  override fun onCreate(savedInstanceState: Bundle?) {
    super.onCreate(savedInstanceState)
    setContentView(R.layout.activity_search)

    // 2
    presenter.attachView(this)

    searchButton.setOnClickListener {
      val query = ingredients.text.toString()
      // 3
      presenter.search(query)
    }
  }

  override fun onDestroy() {
    // 4
    presenter.detachView()
    super.onDestroy()
  }

  // 5
  override fun showQueryRequiredMessage() {
    // Hide keyboard
    val view = this.currentFocus
    if (view != null) {
      val imm = getSystemService(Context.INPUT_METHOD_SERVICE) as InputMethodManager
      imm.hideSoftInputFromWindow(view.windowToken, 0)
    }

    Snackbar.make(searchButton, getString(R.string.search_query_required), Snackbar
        .LENGTH_LONG).show()
  }

  // 6
  override fun showSearchResults(query: String) {
    startActivity(searchResultsIntent(query))
  }
}
- Conform to the SearchPresenter.View interface by implementing 5 and 6.
- Create a new instance of the presenter and attach the view.
- Whenever the user clicks the search button, instead of the activity doing any logic, just call the search method of the presenter.
- When the view is destroyed you must tell the presenter to detach the view.
- Implement showQueryRequiredMessage required by the SearchPresenter.View interface.
- SearchPresenter.View also requires you to implement showSearchResults.
Creating the SearchResults presenter
Create a SearchResultsPresenter class.
// 1
class SearchResultsPresenter(val repository: RecipeRepository) {
  private var view: SearchResultsPresenter.View? = null
  private var recipes: List<Recipe>? = null

  // 2
  fun attachView(view: SearchResultsPresenter.View) {
    this.view = view
  }

  fun detachView() {
    this.view = null
  }

  // 3
  interface View {
    fun showLoading()
    fun showRecipes(recipes: List<Recipe>)
    fun showEmptyRecipes()
    fun showError()
    fun refreshFavoriteStatus(recipeIndex: Int)
  }
}
- This presenter will make the API request therefore it has RecipeRepository as dependency.
- You also need to attach/detach.
- A View interface that your activity will have to conform to.
You may have noticed that you’re repeating the attach/detach logic here, so let’s create a BasePresenter:
abstract class BasePresenter<V> {
  protected var view: V? = null

  fun attachView(view: V) {
    this.view = view
  }

  fun detachView() {
    this.view = null
  }
}
Now extend from this class, remove the view property and the attach/detach methods:
class SearchResultsPresenter(private val repository: RecipeRepository) :
    BasePresenter<SearchResultsPresenter.View>() {
  private var recipes: List<Recipe>? = null

  interface View {
    fun showLoading()
    fun showRecipes(recipes: List<Recipe>)
    fun showEmptyRecipes()
    fun showError()
    fun refreshFavoriteStatus(recipeIndex: Int)
  }
}
Add the following method:
  // 1
  fun search(query: String) {
    view?.showLoading()
    // 2
    repository.getRecipes(query, object : RecipeRepository.RepositoryCallback<List<Recipe>> {
      // 3
      override fun onSuccess(recipes: List<Recipe>?) {
        this@SearchResultsPresenter.recipes = recipes
        if (recipes != null && recipes.isNotEmpty()) {
          view?.showRecipes(recipes)
        } else {
          view?.showEmptyRecipes()
        }
      }

      // 4
      override fun onError() {
        view?.showError()
      }
    })
  }
- This presenter exposes the search method.
- Call the repository to get recipes asynchronously.
- If the call is successful show the recipes (or empty if there are none).
- Whenever there is an error with the call, show the error.
Add the following extra methods:
  // 1
  fun addFavorite(recipe: Recipe) {
    // 2
    recipe.isFavorited = true
    // 3
    repository.addFavorite(recipe)
    // 4
    val recipeIndex = recipes?.indexOf(recipe)
    if (recipeIndex != null) {
      view?.refreshFavoriteStatus(recipeIndex)
    }
  }

  // 5
  fun removeFavorite(recipe: Recipe) {
    repository.removeFavorite(recipe)
    recipe.isFavorited = false
    val recipeIndex = recipes?.indexOf(recipe)
    if (recipeIndex != null) {
      view?.refreshFavoriteStatus(recipeIndex)
    }
  }
- Expose the addFavorite method.
- Alter the state of the model.
- Call the repository to save the favorite.
- Tell the view to refresh with the favorited status.
- Analogously, expose the removeFavorite method.
Implementing SearchResultsPresenter.View
Now, open SearchResultsActivity and modify it to the following:
// 1
class SearchResultsActivity : ChildActivity(), SearchResultsPresenter.View {

  private val presenter: SearchResultsPresenter by lazy {SearchResultsPresenter(RecipeRepository.getRepository(this))}

  override fun onCreate(savedInstanceState: Bundle?) {
    super.onCreate(savedInstanceState)
    setContentView(R.layout.activity_list)

    val query = intent.getStringExtra(EXTRA_QUERY)
    supportActionBar?.subtitle = query

    // 2
    presenter.attachView(this)
    // 3
    presenter.search(query)
    retry.setOnClickListener { presenter.search(query) }
  }
}
- Conform to the SearchResultsPresenter.View interface.
- Instantiate the presenter with the repository and attach the view.
- Whenever the user enters this screen, instead of the activity doing any logic, just call the search method of the presenter.
- When the view is destroyed you must tell the presenter to detach the view.
Implement the SearchResultsPresenter.View interface:
  override fun showEmptyRecipes() {
    loadingContainer.visibility = View.GONE
    errorContainer.visibility = View.GONE
    list.visibility = View.VISIBLE
    noresultsContainer.visibility = View.VISIBLE
  }

  override fun showRecipes(recipes: List<Recipe>) {
    loadingContainer.visibility = View.GONE
    errorContainer.visibility = View.GONE
    list.visibility = View.VISIBLE
    noresultsContainer.visibility = View.GONE

    setupRecipeList(recipes)
  }

  override fun showLoading() {
    loadingContainer.visibility = View.VISIBLE
    errorContainer.visibility = View.GONE
    list.visibility = View.GONE
    noresultsContainer.visibility = View.GONE
  }

  override fun showError() {
    loadingContainer.visibility = View.GONE
    errorContainer.visibility = View.VISIBLE
    list.visibility = View.GONE
    noresultsContainer.visibility = View.GONE
  }

  override fun refreshFavoriteStatus(recipeIndex: Int) {
    list.adapter.notifyItemChanged(recipeIndex)
  }
Implement the missing method:
  private fun setupRecipeList(recipes: List<Recipe>) {
    list.layoutManager = LinearLayoutManager(this)
    list.adapter = RecipeAdapter(recipes, object : RecipeAdapter.Listener {
      override fun onClickItem(recipe: Recipe) {
        startActivity(recipeIntent(recipe.sourceUrl))
      }

      override fun onAddFavorite(recipe: Recipe) {
        // 1
        presenter.addFavorite(recipe)
      }

      override fun onRemoveFavorite(recipe: Recipe) {
        // 2
        presenter.removeFavorite(recipe)
      }
    })
  }
- When adding a favorite, now the adapter listener just calls the presenter’s addFavorite method.
- Also, when the user wants to remove a favorite, just call the presenter’s removeFavorite method.
MVP Refactor done!
Now that the refactor was done, you’ll be able to create unit tests.
Build and run the app and make sure the app behaves just as it did before the refactor.
You can also download the MVP refactored project if you want to. Remember to add the keystore.properties file in order to open the project.
Using Mockito
Setup Mockito dependencies
Open the application’s build.gradle file and add the following dependency:
dependencies {
  ...
  testImplementation 'com.nhaarman:mockito-kotlin-kt1.1:1.5.0'
  ...
}
Mockito-Kotlin is a wrapper library around Mockito.
It provides top-level functions to allow for a more idiomatic approach and also solves a few issues with using the Mockito java library in Kotlin. Check its wiki for more information.
State & Behavior verification
In state verification, you first have the system under test (SUT) configured with all the necessary dependencies (setup phase). Secondly, you perform a certain operation (exercise phase). Finally, you examine the state of the object and verify it’s the expected one (verification phase). This is sometimes called black-box testing. Usually, JUnit is used for this.
In behavior verification, instead, you specify which methods are to be invoked on the dependencies, in other words, you setup expectations, thus verifying not that the ending state is correct, but that the methods were invoked correctly. This is sometimes called white-box testing. Usually, Mockito is used for this.
Mockito main features
- Mock:
The SUT usually has dependencies that are necessary for the SUT to work. If you want to verify a method was called by the SUT, you mock the dependency class and then verify the mocked dependency method was called. - Stubbing:
Sometimes your SUT will follow a certain path or another depending on the results of methods called on its dependencies. To force a dependency to always respond the same way, you need to stub the method.
At last, it’s time for some unit testing! :]
Search unit tests
You’ll create a unit test that verifies that the presenter calls the view’s showQueryRequiredMessage when an empty search is performed.
First delete the ExampleUnitTest:
Add a new class called SearchTests, with the following content:
package com.raywenderlich.ingredisearch

import com.nhaarman.mockito_kotlin.mock
import com.nhaarman.mockito_kotlin.verify
import org.junit.Test

class SearchTests {
  // 1
  @Test
  fun search_withEmptyQuery_callsShowQueryRequiredMessage() {
    // 2
    val presenter = SearchPresenter()
    // 3
    val view: SearchPresenter.View = mock()
    presenter.attachView(view)

    // 4
    presenter.search("")

    // 5
    verify(view).showQueryRequiredMessage()
  }
}
- Every unit test must start with the @Test annotation.
- Instantiate the presenter.
- Because you don’t need a real view that conforms to the interface, you can mock it.
Then attach this view to the presenter. - Call the search method with an empty query.
- Verify on the mocked view that the presenter calls showQueryRequiredMessage
Now to run the test, press on the little green arrow (the arrow will have a circle after the first run of the tests) to the left of the class declaration:
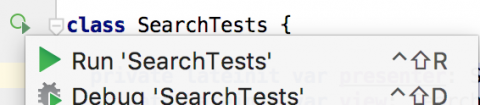
Hopefully you’ll get all green! :]

Refactoring the unit test
Because all SearchTests will basically share the same setup, you should add a setup() function with a @Before annotation as follows:
class SearchTests {

  private lateinit var presenter : SearchPresenter
  private lateinit var view : SearchPresenter.View

  @Before
  fun setup() {
    presenter = SearchPresenter()
    view = mock()
    presenter.attachView(view)
  }
  ...
The function marked @Before is executed before any test, therefore it’s a good place to setup objects/mocks. It’s also common to see a tearDown() function marked @After in test classes, which is run when a test completes.
Modify your first test with the following:
  @Test
  fun search_withEmptyQuery_callsShowQueryRequiredMessage() {
    presenter.search("")

    verify(view).showQueryRequiredMessage()
  }
Verify a method is never called
You can also test that a function is never called by adding the following test:
  @Test
  fun search_withEmptyQuery_doesNotCallsShowSearchResults() {
    presenter.search("")

    verify(view, never()).showSearchResults(anyString())
  }
Note: Android Studio will mark never() as an unresolved reference. Make sure you import the com.nhaarman.mockito_kotlin option which is the Mockito wrapper.
Search results tests
Kotlin default final classes/methods
Before proceeding to create these tests, it’s important to mention that Kotlin classes and methods by default are final. Mockito won’t work with final classes/methods, but there are a few workarounds:
- Add the open keyword to classes and methods that you’ll mock.
- Create an interface and have the class implement the interface. Then, just mock the interface (interfaces are open by default).
- Use mock-maker-inline. You’ll do this later.
Repository refactor
Because in the following tests you’ll mock the repository, we’re going to take the interface approach.
So, use Shift+F6 to rename the RecipeRepository class to RecipeRepositoryImpl and create a new RecipeRepository interface with all the public methods, you can also move the RepositoryCallback outside:
interface RecipeRepository {
  fun addFavorite(item: Recipe)
  fun removeFavorite(item: Recipe)
  fun getFavoriteRecipes(): List<Recipe>
  fun getRecipes(query: String, callback: RepositoryCallback<List<Recipe>>)
}

interface RepositoryCallback<in T> {
  fun onSuccess(t: T?)
  fun onError()
}
Open RecipeRepositoryImpl and implement RecipeRepository:
class RecipeRepositoryImpl(private val sharedPreferences: SharedPreferences) :
    RecipeRepository
Add the override keyword to the corresponding methods (also, be sure to remove RepositoryCallback from RecipeRepositoryImpl if you added it into the interface file).
Also, open SearchResultsPresenter and modify it to use the interface:
class SearchResultsPresenter(val repository: RecipeRepository) :
    BasePresenter<SearchResultsPresenter.View>()
And fix the anonymous RepositoryCallback:
repository.getRecipes(query, object : RepositoryCallback<List<Recipe>> {
Setup Search results tests
Add a new class called SearchResultsTests to the test package:
package com.raywenderlich.ingredisearch

import com.nhaarman.mockito_kotlin.mock
import org.junit.Before

class SearchResultsTests {

  private lateinit var repository: RecipeRepository
  private lateinit var presenter: SearchResultsPresenter
  private lateinit var view: SearchResultsPresenter.View

  @Before
  fun setup() {
    repository = mock()
    view = mock()
    presenter = SearchResultsPresenter(repository)
    presenter.attachView(view)
  }
}
Add the following tests:
  // 1
  @Test
  fun search_callsShowLoading() {
    presenter.search("eggs")

    verify(view).showLoading()
  }

  // 2
  @Test
  fun search_callsGetRecipes() {
    presenter.search("eggs")

    verify(repository).getRecipes(eq("eggs"), any())
  }
These tests verify:
- That the view is shown as “loading” whenever the presenter is required to search.
- If the repository is called with the corresponding parameters (“eggs”), then the eq matcher is used to verify that it’s called with the same string. The any matcher was used for the callback parameter because you don’t care about it.
Try and run these search results tests using the green arrow next to the test class name.
Stub a callback
Now, create a test that stubs the response of the recipes repository and verifies that the presenter calls showRecipes on the mocked view.
  @Test
  fun search_withRepositoryHavingRecipes_callsShowRecipes() {
    // 1
    val recipe = Recipe("id", "title", "imageUrl", "sourceUrl", false)
    val recipes = listOf<Recipe>(recipe)

    // 2
    doAnswer {
      val callback: RepositoryCallback<List<Recipe>> = it.getArgument(1)
      callback.onSuccess(recipes)
    }.whenever(repository).getRecipes(eq("eggs"), any())

    // 3
    presenter.search("eggs")

    // 4
    verify(view).showRecipes(eq(recipes))
  }
- Create a list of recipes.
- Stub the repository getRecipes method to return these recipes.
- Call the search method.
- Verify that the presenter calls showRecipes on the mocked view with the list of recipes.
Go ahead and run the new test to make sure all is good.
Verify state
The following test is just a JUnit test:
  @Test
  fun addFavorite_shouldUpdateRecipeStatus() {
    // 1
    val recipe = Recipe("id", "title", "imageUrl", "sourceUrl", false)

    // 2
    presenter.addFavorite(recipe)

    // 3
    Assert.assertTrue(recipe.isFavorited)
  }
- Create a recipe.
- Call the addFavorite method.
- Verify that the recipe isFavorited flag has changed.
Run the test to make sure the state of a recipe is changed correctly when marked as a favorite.
RecipeRepository tests
Before creating the tests, open RecipeRepositoryImpl and look at the following functions:
  override fun addFavorite(item: Recipe) {
    // 1
    val favorites = getFavoriteRecipes() + item
    saveFavorites(favorites)
  }

  // 2
  private fun saveFavorites(favorites: List<Recipe>) {
    val editor = sharedPreferences.edit()
    editor.putString(FAVORITES_KEY, gson.toJson(favorites))
    editor.apply()
  }
- The addFavorite method, first calls getFavoriteRecipes and appends an item.
- Then it saves to SharedPreferences using a JSON format.
You’ll create a test that verifies this behavior.
Because you’ll need to stub getFavoriteRecipes() and also you’ll need to call the real addFavorite method, a mock on the RecipeRepository interface won’t work. You need to spy on a real instance of RecipeRepositoryImpl. More on the spy feature later.
Mock maker inline
Now, recall that Kotlin by default has final classes and final methods (unless you use the open keyword).
So, instead of adding the open keyword to the RecipeRepositoryImpl class and methods, create a text file under app/src/test/resources/mockito-extensions called org.mockito.plugins.MockMaker with the following content (it may be easier to switch to the Project view in the Project pane in order to add the new directory and text file):
mock-maker-inline
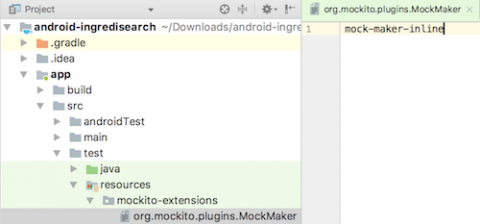
This will enable you to mock/spy on real classes without adding the open keyword.
Spy the repository implementation
Add a new class to the test package called RepositoryTests with the following content:
package com.raywenderlich.ingredisearch

import android.content.SharedPreferences
import com.nhaarman.mockito_kotlin.mock
import com.nhaarman.mockito_kotlin.spy
import com.nhaarman.mockito_kotlin.whenever
import org.junit.Before

class RepositoryTests {
  private lateinit var spyRepository: RecipeRepository
  private lateinit var sharedPreferences: SharedPreferences
  private lateinit var sharedPreferencesEditor: SharedPreferences.Editor

  @Before
  fun setup() {
    // 1
    sharedPreferences = mock()
    sharedPreferencesEditor = mock()
    whenever(sharedPreferences.edit()).thenReturn(sharedPreferencesEditor)

    // 2
    spyRepository = spy(RecipeRepositoryImpl(sharedPreferences))
  }
}
- You need to mock SharedPreferences and the corresponding editor.
- Because you’ll stub the RecipeRepository‘s getRecipes method but you also need to call the real addFavorite method on the same object, instead of a mock you need a spy.
Finally, create the test:
  @Test
  fun addFavorite_withEmptyRecipes_savesJsonRecipe() {
    // 1
    doReturn(emptyList<Recipe>()).whenever(spyRepository).getFavoriteRecipes()

    // 2
    val recipe = Recipe("id", "title", "imageUrl", "sourceUrl", false)
    spyRepository.addFavorite(recipe)

    // 3
    inOrder(sharedPreferencesEditor) {
      // 4
      val jsonString = Gson().toJson(listOf(recipe))
      verify(sharedPreferencesEditor).putString(any(), eq(jsonString))
      verify(sharedPreferencesEditor).apply()
    }
  }
- Stub the getFavoriteRecipes() with an empty list. Notice that when stubbing spies you need to use doReturn/whenever/method.
- Call the real addFavorite method with a recipe.
- Check that the subsequent verifications are executed in the exact order.
- Verify that the list is saved correctly with JSON format.
Go ahead and run the repository tests to see the spy in action!
Where To Go From Here?
Congratulations! You’ve just learned the basics of using Mockito for unit testing.
You can download the final project here. Remember to add the keystore.properties file in order to open the project.
In this tutorial, you added the unit tests after writing the code. In Test Driven Development (TDD), you write the unit tests first and only add code to pass the currently failing unit test.
I suggest reading the following:
- Mockito reference: To delve more into this topic, please have a look at the Mockito-Kotlin and Mockito wikis.
- Mocks aren’t stubs: You’ll commonly hear in the jargon “You should mock that”, but they aren’t always strictly referring to mocks. An article from Martin Fowler explains the difference.
- Dependency injection: In order to make your app more testable, it’s good to have your dependencies injected somehow. This Dagger 2 tutorial will help you with that.
- Test patterns: Because writing tests is a bit of an art form, this book from Gerard Meszaros will explain some great patterns to you. It’s an incredible reference.
- Espresso codelab: If you’re wondering how UI tests are done, this codelab from Google Developers will help you get started.
For even more testing practice, check out our book, Android Test-Driven Development by Tutorials.